6 Easy Halloween Craft Projects for Kids That Are Fun, Creative And Budget-Friendly
Halloween fun doesn’t have to cost a lot or require elaborate costumes. Sometimes, a few sheets of colored paper, empty toilet paper rolls, and a little imagination are enough to turn an ordinary afternoon into a spooky celebration.
Americans are expected to spend $13.5 billion celebrating Halloween this year, with 42% planning to decorate their homes or yards. But before filling your shopping cart with seasonal decorations, consider these six easy Halloween crafts that let kids create their own festive masterpieces.
Paper Plate Ghosts That Float Around the House
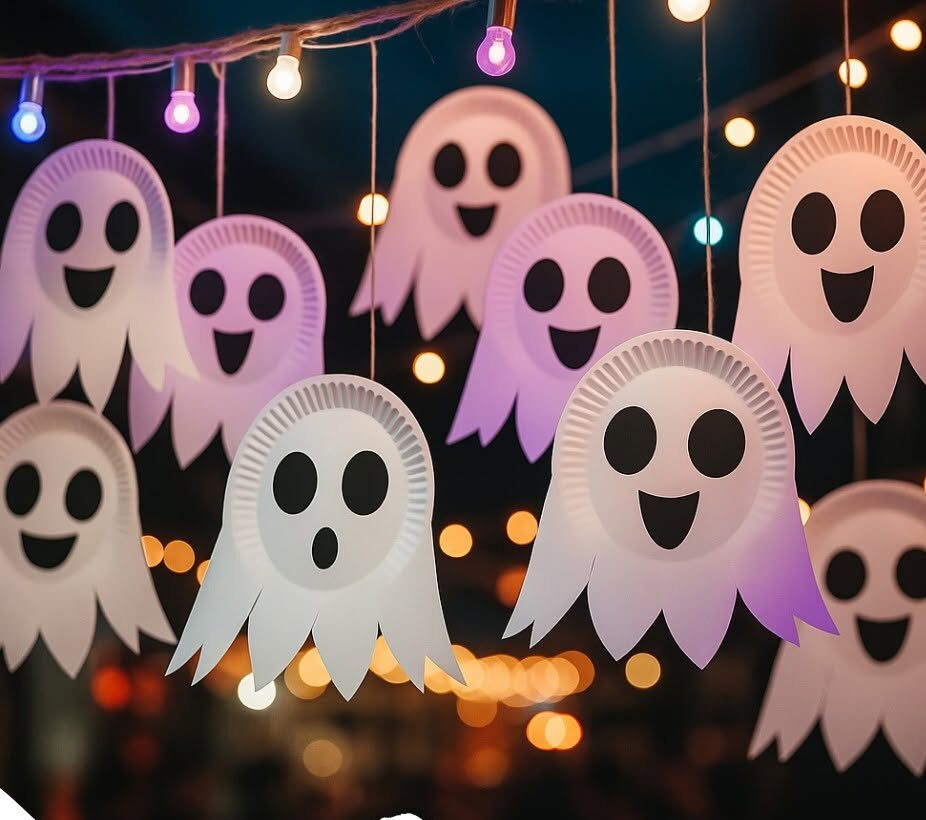
Who knew an ordinary paper plate could become an adorable floating ghost? This simple project is perfect for younger children because it needs only a few supplies and leaves plenty of room for creativity.
You’ll need white paper plates, black construction paper, glue, scissors, white tissue paper or streamers, and some string for hanging. If you don’t have construction paper, a black marker works just as well for drawing spooky expressions.
Start by turning the paper plate into your ghost’s face. Let the kids draw or glue on large black eyes and an open mouth. They can make their ghosts look frightened, silly, sleepy, or even cheerful.
Next, cut long strips of white tissue paper and attach them along the bottom edge of the plate. These strips will sway gently whenever someone walks past, giving the ghost its floating appearance.
Once everything dries, an adult can make a small hole at the top and thread string through it. Hang the finished ghosts near windows, along a hallway, or above a Halloween party table.
For extra fun, encourage each child to name their ghost and invent a short story about it. A collection of silly-looking ghosts can become a family Halloween decoration that everyone helped create.
Toilet Paper Roll Bats With Flapping Wings
Before tossing those empty toilet paper rolls into the recycling bin, save a few for this Halloween project. They make excellent little bats, and kids can turn them into an entire colony with a few basic crafting supplies.
Gather empty cardboard rolls, black paint or construction paper, glue, scissors, and white paper for the eyes. You can also use washable markers instead of paint to avoid a messy cleanup.
Have the children paint each cardboard roll black or wrap it in black construction paper. While the rolls dry, help them draw bat wings on another piece of paper.
Cut out the wings and attach them to the back of each roll. For a playful touch, fold the wing tips slightly forward so they look ready for flight.
Now comes the best part: creating the faces. Some bats might have wide eyes and tiny white fangs, while others can have goofy smiles or colorful ears.
Children can arrange their finished bats on bookshelves, windowsills, or a Halloween display table. If you want to hang them, an adult can attach string securely to each cardboard roll.
This project also lets children experiment with different shapes and sizes. Try making oversized wings for one bat and tiny wings for another, then let the kids decide which designs look funniest.
Related Post:The Most Popular Halloween Costumes for Kids in 2026, According to the NRF
Glowing Pumpkin Jars Without the Carving
Pumpkin carving is a Halloween classic, but sharp knives and slippery pumpkin surfaces make it an adult job. Fortunately, kids can enjoy making glowing jack-o’-lantern decorations without carving anything.
For this project, gather clean jars, orange tissue paper, black construction paper, child-friendly craft glue, a paintbrush, and battery-operated LED tea lights. Clear plastic containers can also work instead of glass jars.
Begin by tearing the orange tissue paper into small pieces. Children can brush a thin layer of glue onto the outside of the container and carefully press the tissue paper into place.
Continue until most of the surface is covered in orange. A slightly uneven finish is perfectly fine because the overlapping paper gives each pumpkin its own character.
Next, cut triangles for eyes and a nose, along with a funny or frightening mouth. Glue these black paper shapes onto the outside of the container to create a jack-o’-lantern face.
After the glue dries, place a battery-operated light inside and switch it on. The orange paper will glow, giving the pumpkin a cheerful Halloween appearance.
These decorations look especially charming on a mantel, dining table, or windowsill. Use flameless lights only, and keep loose batteries and battery compartments out of reach of young children.
Handprint Spiders on Colorful Halloween Webs
A little black paint and a pair of small hands can make one of the cutest Halloween decorations. Handprint spiders are especially fun because every child makes something slightly different.
You’ll need washable black paint, colorful construction paper, a paintbrush, white crayons or markers, and paper towels for cleanup. Purple, orange, and green backgrounds work particularly well for Halloween.
First, draw a spiderweb across a sheet of construction paper using a white crayon. Older children can make detailed webs with intersecting lines, while younger kids can create simple circles and straight lines.
Next, carefully paint one of the child’s hands black, leaving out the thumb if possible. Press the hand onto the paper with the fingers pointing outward.
Repeat the process with the other hand, overlapping the palms so the fingers extend in opposite directions. The combined handprints form the spider’s body and eight legs.
Once the paint dries, add eyes using white paint or paper circles. Children can also draw smiling mouths, tiny hats, or colorful patterns around their spiders.
These handprint creations make wonderful refrigerator decorations. Parents can write each child’s name and the year on the back, turning a simple Halloween activity into a seasonal keepsake.
Coffee Filter Monsters With Wild Colors
Not every Halloween creature needs to look frightening. Some of the most entertaining monsters are the ones covered in rainbow colors, giant eyes, and ridiculous expressions.
Coffee filter monsters are an easy way to combine painting, color mixing, and imaginative play. Best of all, the project uses lightweight, easy-to-find materials.
Gather white coffee filters, washable markers, a spray bottle filled with water, construction paper, glue, and stickers or paper cutouts for facial features.
Have the children flatten their coffee filters and decorate them with colorful marker patterns. Encourage them to use several different colors rather than filling the entire filter with one shade.
Place the decorated filters on a washable tray or protected surface. An adult can lightly mist them with water and watch as the colors spread across the paper.
Allow the filters to dry completely before adding eyes, mouths, horns, or other silly features. Kids can cut shapes from construction paper to add extra personality.
One monster might have three eyes and purple teeth, while another could have a huge smile and tiny green ears. There are no rules about what these creatures should look like.
Display the finished monsters on a classroom bulletin board or create a colorful Halloween gallery at home. This project works especially well for groups because each finished monster looks unique.
Egg Carton Spiders That Crawl Across the Table
If your recycling bin has an empty cardboard egg carton, you already have the foundation for another easy Halloween craft. With a little paint and a few paper legs, those small carton cups can become miniature spiders.
Start with a clean, dry cardboard egg carton, black or purple washable paint, construction paper, glue, and markers. Adults should cut the carton into individual cups before handing them to younger children.
Turn each cup upside down and let the children paint the outside. Traditional black spiders look spooky, but bright orange, purple, or green versions can be just as entertaining.
While the paint dries, cut eight narrow strips of construction paper for each spider. Fold the strips into little zigzags to make the legs look bent.
Glue four legs onto each side of the carton cup and let them set. Finish by drawing or attaching large paper eyes and a silly mouth.
For a family activity, make several spiders in different colors and arrange them around a handmade paper web. Children can even create a pretend spider neighborhood using leftover cardboard boxes and colored paper.
The finished spiders are lightweight enough to decorate a party table or shelf. For younger children, use paper facial features rather than small detachable accessories.
Making Halloween Craft Time Easier for Everyone
Halloween crafting should feel like playtime, not another complicated household project. Set up a dedicated workspace with washable supplies, protect the table with old newspaper, and gather materials before inviting the kids to begin.
Safety deserves attention, too. The American Academy of Pediatrics reminds families that small toys can present choking hazards for young children. Adults should supervise scissors, handle any sharp tools, and choose age-appropriate materials throughout the activity.
You also don’t need to complete all six crafts in one afternoon. Choose one project for a rainy day, another for a weekend family activity, and perhaps a third for a Halloween party.
These homemade decorations fit neatly into a broader holiday shopping trend. The National Retail Federation reported that 34% of Halloween shoppers in 2026 planned to look for items they could reuse or repurpose, while 31% said they would compare prices if Halloween merchandise cost more than expected.
The sweetest part of Halloween crafting isn’t having perfectly painted pumpkins or perfectly shaped paper bats. It’s watching children proudly display something they made with their own hands, knowing those little creations helped make the holiday special.
Posts You Might Like:
9 Things You Should Never Do When Handing Out Halloween Candy
11 Halloween Habits That Make the Whole Neighborhood Quietly Dislike You